One of the nice new features of Application Express is the new tree region. It is based on jsTree and supports features such as tool-tips. jsTree is the same tree used for the new tree view of the Application Builder Page Definition page. That page supports a right click context menu which is missing from the current version of the Application Express new tree region. With a little help from Patrick, I was able to add a context menu to a tree region I was working on for an update to the Document Library packaged application. The purpose of this article is to describe how to do this for your tree regions. I will use the EMP table as a simple example.
Disclaimer:
Patrick wanted me to mention that we may change the implementation of the tree in the future, so you may have to adjust the JavaScript code listed here in future versions of Application Express.
Let's start by creating a copy of the emp table, emp2, so you don't actually mess with the emp data. Use the SQL Workshop SQL Command Processor and the code in listing 1 to create emp2.
Code Listing 1
create table emp2 as select * from emp
/

alter table emp2 add constraint emp2_pk primary key (empno)
/

alter table emp2 add constraint emp2_fk foreign key (mgr) references emp2(empno)
/
Create Application and Tree
With emp2 in place you are ready to create an application. Simply run the create application wizard and create a form and report on emp2. You will replace the report on page 1 with a tree region. After the application is created, edit page 1. Delete the report region and then create a new tree region specifying the following options:
- Display Attributes, Title: Employees
- Tree Template: Default
- Table/View: EMP2
- Confirm that all values are defaulted on the Query step
- Tooltip: Database Column
- Tooltip Column: HIREDATE
Run the page and confirm that your tree appears. When you right click on a node, you should only see that standard right click options of whatever browser you are using.
Create Context Menu
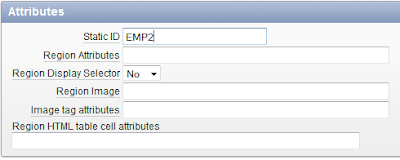
Now for the magic! By sprinkling a little JavaScript on the page here and there, we will get a nice right click context menu. First edit the tree region and give the region a static ID of EMP2 as in figure 1. We need this static ID to make it easier to write JavaScript and select this region with jQuery.
Figure 1

Now you just need to sprinkle a little JavaScript on the page! Edit the page definition of page one and add the code in code listing 2 into the Function and Global Variable Declaration text area and the code in code listing 3 into the Execute when Page Loads text area.
Code Listing 2
function doAction(pNode,pTree,a){
  var l_action;
  var l_id;

  l_id = pNode.attr("id");

  if (a=="create") { l_action = "f?p="+$v('pFlowId')+":2:"+$v('pInstance')+":::2:P2_MGR:"+l_id }
  if (a=="delete") { deleteEmp(pNode,l_id); }
  if (a=="edit") { l_action = "f?p="+$v('pFlowId')+":2:"+$v('pInstance')+"::::P2_EMPNO:"+l_id }

  if (l_action != null) {document.location.href=l_action; }
}
Code Listing 3
var lTreeContextMenu={
    items:{create:false,rename:false,remove:false,
        contextmenu_create:{
            label:"Add Employee",
            icon: "",
            visible: true,
            action: function(pNode, pTree){doAction(pNode, pTree, "create");}
        },
        contextmenu_delete:{
            label:"Delete",
            icon: "",
            visible: true,
            action: function(pNode, pTree){doAction(pNode, pTree, "delete");}
        },
        contextmenu_edit:{
            label:"Edit",
            icon: "",
            visible: true,
            action: function(pNode, pTree){doAction(pNode, pTree, "edit");}
        }
}};

        // use jsTree to render the tree
        var lTreeSel = apex.jQuery("#EMP2").find("div.tree");
        var lTreeId = lTreeSel.attr("id");
        var lDataId = lTreeId.replace("tree","");
        var lTreeData = eval("l"+lDataId+"Data");
        var lTree = lTreeSel.tree({
          data:{
            type:"json",
            async:true,
            opts:{
              "static":lTreeData,
              isTreeLoaded:false,
              method:"POST",
              url:"wwv_flow.show"
            }
          },
          root:{
            draggable:false,
            valid_children: "folder"
          },
          folder:{
            valid_children: "file"
          },
          file:{
            valid_children: "none",
            max_children: 0,
            max_depth:0
          },
          opened:["7839"],
          plugins:{contextmenu:lTreeContextMenu}
          });

        $.showTooltip = function(pEvent) {
        var lAction = apex.jQuery(pEvent.target).attr("tooltip");
        if (lAction && lAction != "") {
            toolTip_enable(pEvent,this,apex.jQuery(this).attr("tooltip"));
        }
        }; // showTooltip

        // Bind Tooltips for tree nodes
        apex.jQuery('a[tooltip]', lTreeSel).bind("mouseover", $.showTooltip);

        // Hack for right click problem on selected node
        apex.jQuery("#EMP2").find("a").live("mouseup",function() {apex.jQuery("#EMP2").find("a").removeClass()});
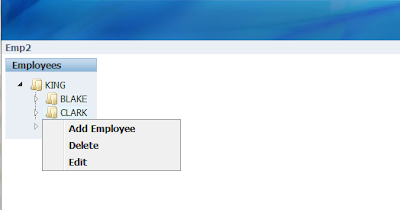
Now when you run the page you should see a right click context menu when you right click on a node in your tree, like figure 2. Note that the Add Employee and Edit actions are implemented and working. The delete action is not yet working, that will be added next.
Figure 2

Implement Delete Action
Technically the delete action is already implemented. You could edit the employee and just click delete on the next page. What sounds like more fun is to call an on demand process using AJAX from some JavaScript, and then use jQuery to remove the node from the tree, display a confirmation message, all without doing a page submit. First things first though, create a region that will hold the message specifying the following options:
- Region Type: HTML
- Title: Message Container
- Region Template: No Template
- Sequence: 5
- Region Source: See Code Listing 4
Code Listing 4
<div class="success" id="success-message" style="display:none;">
  <img src="#IMAGE_PREFIX#delete.gif" onclick="apex.jQuery('#success-message').hide()" style="float:right;" class="remove-message" alt="" />
<div id="theMessage">This is a placeholder for messages</div>
</div>
Now we have a place for messages. Next, create a process on page 1 with the following options:
- Process Type: PL/SQL
- Name: DELETE_EMPLOYEE
- Point: On Demand – Run this process when requested by AJAX
- PL/SQL Page Process: See Code Listing 5
Code Listing 5
begin
    delete from emp2 where empno = apex_application.g_x01;
    owa_util.mime_header('text/xml', FALSE );
    htp.p('Cache-Control: no-cache');
    htp.p('Pragma: no-cache');
    owa_util.http_header_close;
    htp.p('{result:"success",message:"Employee successfully deleted"}');
exception when others then
    owa_util.mime_header('text/xml', FALSE );
    htp.p('Cache-Control: no-cache');
    htp.p('Pragma: no-cache');
    owa_util.http_header_close;
    htp.p('{result:"failed",message:"Error deleting employee: '||sqlerrm||'"}');
end;
Finally, you add the JavaScript to do the AJAX call, display the result message, and remove the node from the tree. Edit the page attributes and add the code in code listing 6 in the Function and Global Variable Declaration text area before the existing doAction function.
Code Listing 6
function confirmSubmit(){
var agree=confirm("Are you sure you wish to continue and delete?");
if (agree)
 return true ;
else
 return false ;
}

function deleteEmp(pNode,pId){
  var lTest = confirmSubmit();
  if (lTest) {
    var get = new htmldb_Get(null,$v('pFlowId'),'APPLICATION_PROCESS=DELETE_EMPLOYEE',$v('pFlowStepId'));
    get.addParam('x01',pId);
    gReturn = get.get();
    var j = eval("("+gReturn+")");
    apex.jQuery("#theMessage").text(j.message);
    apex.jQuery("#success-message").show();
    if (j.result == "success") {
        pNode.remove();
    }

    get = null;
  }
}
Now run the page and unroll Clark. Right click on Miller and choose delete. Confirm the delete and the result should be similar to figure 3.
Figure 3

8 comments:
Hi, thanks for this article - is very helpful.
How is the work on the Document Library going - when can I see it?
Regards,
Andrzej
Andrzej,
It should be release by the end of the year at the latest. I would look for it sometime in November.
Regards,
Jason
Jason,
Thanks for the article. it is really cool. Please post more examples on jquery capabilities for apex applications.
Regards
Satya
Jason,
Thanks for this!
I hope you can help me with a problem though. How can I manage to keep the highlighting of the selected node, that is used in the standard tree? I see the hard-coded 7839 empno, should I adapt this?
Jacob
PS
A similar problem was posted here:
https://forums.oracle.com/forums/thread.jspa?threadID=2217567
Sweet. Thanks for posting this Jason (and Patrick)!
Hi, thanks for such a great article. How can I get this to work in Apex 4.2.1 as the query for the tree structure has changed from previous versions?
Regards,
Raj
Unfortunatley we have found as you have that this does not work in 4.2.1 and above. Patrick looked at it and couldn't figure out how to make it work. I guess it was good I included the disclaimer!
decision is. read https://forums.oracle.com/thread/2219567
it works!!!
Post a Comment