Tuesday, October 29, 2019
How to Script Workspace Provisioning on Oracle Autonomous Database
I have moved my blogging over to blogs.oracle.com/apex. See my latest post here.
Tuesday, November 13, 2018
Multitenant ORDS with Local APEX in PDBs
Oracle REST Data Services (ORDS) has a great feature that allows you to address PDBs that have APEX in them, just by using the name of the PDB in the URL, right after the ORDS context root. So if I have two PDBs, named apex181 and apex182, I can address them with URLs similar to the following:
http://localhost:8080/ords/apex181/
and...
http://localhost:8080/ords/apex182/
The names of my PDBs imply that I have two different versions of APEX installed in the CDB. This is only possible if APEX is installed locally in each PDB and not in CDB$ROOT. To allow for ORDS to be multitenant while APEX is local to the PDBs, you must pre-create APEX_PUBLIC_USER, APEX_LISTENER, and APEX_REST_PUBLIC_USER database users as common users in the CDB. You can do this easily with the $ORACLE_HOME/rdbms/admin/catcon.pl perl utility script for running Oracle supplied scripts.
Create APEX Users Common
$ORACLE_HOME/perl/bin/perl -I $ORACLE_HOME/rdbms/admin $ORACLE_HOME/rdbms/admin/catcon.pl -b create_apex_pub -- --x'grant create session to apex_public_user identified by oracle'$ORACLE_HOME/perl/bin/perl -I $ORACLE_HOME/rdbms/admin $ORACLE_HOME/rdbms/admin/catcon.pl -b create_apex_list -- --x'grant create session to apex_listener identified by oracle'
$ORACLE_HOME/perl/bin/perl -I $ORACLE_HOME/rdbms/admin $ORACLE_HOME/rdbms/admin/catcon.pl -b create_apex_rest_pub -- --x'grant create session to apex_rest_public_user identified by oracle'
Obviously you will want to come up with a better password than the ones in the example above. Also note that I am using a funny syntax to create the users, using the grant statement. This allows me to create the user and do the grant in one statement.
Install ORDS Multitenant
Follow the advanced installation instructions for installing ORDS, making sure you specify the service name of the CDB.
java -jar ords.war install advanced
Make All PDBs Addressable
To make all PDBs, including newly created PDBs addressable through a URL, you add a parameter to the defaults.xml file which can be found in the ords directory in the location you specified during installation. The value of the parameter should match the database parameter DB_DOMAIN.
SQL> show parameter DB_DOMAIN
NAME TYPE VALUE
------------------------------------ ----------- ------------------------------
db_domain string
In my case, there is no DB_DOMAIN value, so in defaults.xml, I made the following entry:
Otherwise, enter the value you see for parameter DB_DOMAIN and make sure you precede it with a dot, or period (.).
Install APEX Locally in each PDB
The last step is to install APEX locally in the PDB. After you install APEX, you can access it through ORDS, by appending the name of the PDB name, after the ords context root in the URL.
Thursday, July 19, 2018
Removing Prior Versions of APEX in a PDB
Dimitri Gielis discovered a possible gap in our Application Express Installation Guide about removing prior versions of APEX, when APEX is installed locally in a PDB. If you follow our recommendation to remove the prior version of APEX after a successful upgrade to APEX 18.1, you might run into something similar to the following:
SQL> alter session set container=APEX18;
Session altered.
SQL> SELECT username
FROM dba_users
WHERE ( username LIKE 'FLOWS\_______' ESCAPE '\'
OR username LIKE 'APEX\_______' ESCAPE '\' )
AND username NOT IN ( SELECT schema
FROM dba_registry
WHERE comp_id = 'APEX' ); 2 3 4 5 6 7
USERNAME
--------------------------------------------------------------------------------------------------------------------------------
APEX_050100
SQL> DROP USER APEX_050100 CASCADE;
DROP USER APEX_050100 CASCADE
*
ERROR at line 1:
ORA-28014: cannot drop administrative users
You would encounter this error if you followed section "4.14.3 Removing Schemas from Prior Installations" in the Installation Guide. The section you actually need to follow is "4.14.4 Removing Schemas from Prior Installations in a CDB." Now, you may argue that since APEX is installed locally, you are not installed in a CDB. But you actually are. You just don't have APEX installed in CDB$ROOT, but your database architecture is still a CDB. You need to use catcon.pl to drop the Oracle Maintained APEX_050100 schema like the following example:
$ORACLE_HOME/perl/bin/perl -I $ORACLE_HOME/rdbms/admin $ORACLE_HOME/rdbms/admin/catcon.pl -b drop_apex050100 -- --x'drop user APEX_050100 cascade'
The command above though will run in every container, or PDB, in the CDB. In some containers, APEX_050100 will not exist, and you will see an error in the catcon logs. Also, you may only want to drop the APEX_050100 schema from a particular PDB. There is the gap in the documentation, and what we need to add to the next version. In my case, my PDB was called APEX18, so to drop APEX_050100 only in the APEX18 PDB, the command would be:
$ORACLE_HOME/perl/bin/perl -I $ORACLE_HOME/rdbms/admin $ORACLE_HOME/rdbms/admin/catcon.pl -b drop_apex050100 -c 'APEX18' -- --x'drop user APEX_050100 cascade'
We will add this example as well as try and make the section title and lead in more clear in the next version of the Installation Guide.
We will add this example as well as try and make the section title and lead in more clear in the next version of the Installation Guide.
Friday, March 16, 2018
APEX 18.1 New Feature: Logging Web Service Requests
APEX has turned 18 (ish) and EA-2 is now available. In this post, I will introduce a brand new (very small) feature of APEX 18.1.
APEX has had some support for consuming web services even before it was a shipped product (even before it was called HTMLDB). With this release of APEX, Carsten Czarski has made consuming RESTful style web services and the new ORDS REST Enabled SQL feature a breeze. You can read all about this new support in a series of excellent blog posts by Carsten here.
Also introduced in this release is a log of all web service requests made through APEX. Whether they are made through the greatly improved RESTful Web Sources and Remote SQL, the legacy web service REST and SOAP web references, or either the APEX_WEB_SERVICE or APEX_EXEC PL/SQL API, the request is logged. This log can be useful for workspace administrators and developers to get a glimpse of all web service requests being done by the workspace. The view APEX_WEBSERVICE_LOG contains the log information.

Figure 1 - APEX_WEBSERVICE_LOG
As a developer or administrator in a workspace, you can query this view to find the URL, method, request content length, HTTP status code, response content length, the time in seconds between request and response, the date of the request, and the user making the request. To find a description of all the columns in the APEX_WEBSERVICE_LOG view, you can go to the Data Dictionary report in SQL Workshop Utilities.

Figure 2 - Data Dictionary report for APEX_WEBSERVICE_LOG
The logging of all web service requests is even more useful for administrators of the entire APEX instance. If you are running a hosting business, this log can be used for forensics in case any of your tenants used your service as a launch platform for attacks on other systems. There is a handy interactive report on the log available in Instance Administration - Monitor Activity - Web Service Activity Log.

Figure 3 - Web Service Activity Log in Internal Administration
By default, there is a log switch every 14 days, so you will have about 28 days of log. If you need to retain information longer than that (or not as long), you can change the default at Internal Administration - Manage Instance - Manage Log Interval.

Figure 4 - Manage Log Interval in Internal Administration
And finally, also handy for hosting or cloud providers, you can set the maximum number of web service requests that each workspace can do in a twenty four hour period. You set the maximum in Internal Administration - Manage Instance - Security - Workspace Isolation.

Figure 5 - Maximum Web Service Requests in Workspace Isolation
You can also override the instance setting at the workspace level. In internal Administration, go to Existing Workspaces, find the workspace, and click on the workspace name to edit the properties. Set Maximum Web Service Requests under Workspace Isolation.
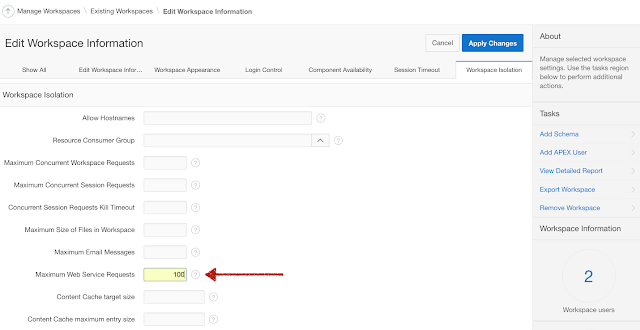
Figure 6 - Override ride Maximum Web Service Requests for a Workspace
And there you have it, your 18.1 new feature "nugget," logging web service requests. I hope you find it useful.
Friday, February 3, 2017
Convert Common Oracle Application Express in a CDB to Local APEX in PDBs
Introduction
When Oracle Multitenant was released with Oracle Database 12.1.0.1.0 in June 2013, Oracle Application Express was installed by default common in the CDB in CDB$ROOT, PDB$SEED, and all PDBs. In fact, that was the architecture that we recommended at that time. As we have gained experience with multitenant in our internal deployments, we realized that our initial recommendation was wrong. Having APEX installed common locks you in to one version for your entire CDB, and when you need to upgrade APEX, you have to upgrade every PDB, even if that PDB is not using APEX. This would cause unnecessary added time to APEX upgrades.Applying the lessons we have learned in our internal deployments, we have been recommending that customers remove Oracle Application Express from their CDBs and install APEX locally in PDBs since version 5.0.
What do you do if you have been using the common APEX from 12.1.0.1.0 or 12.1.0.2.0, and now you want to follow our new recommendation of having APEX installed locally in a PDB? We have been asked that question many times by both internal and external customers. Unfortunately there is no simple answer, no magic SQL script you can run to do the conversion, so we have never really had a good answer.
Then my manager, Joel Kallman, had a novel idea. He reminded me of the work I did for the Oracle Database Cloud Schema Service, to effectively export almost every single artifact of a workspace, using the command line utility APEXExport, so that a schema service tenant could be moved from one APEX instance to another. This involved greatly expanding our workspace export code, modifying APEXExport to allow for more export options, and then scripting the calls to APEXExport, including creating an installer script to invoke all the exports, and finally zipping the scripts produced. Joel's idea was to reuse this method in a process to convert a CDB where APEX is installed common, to a CDB where APEX is installed locally in PDBs.
The Big Idea
The high level steps to convert common APEX in a CDB to local APEX in PDBs are:- Identify all PDBs in your CDB that have APEX instances
- In each PDB, identify all workspaces
- Run a script to export all artifacts of all workspaces identified in step 1 into zip files with installers
- Completely back up your CDB
- Run the APEX removal script to remove APEX from the CDB and all PDBs
- Install APEX locally in each PDB identified in step 1. (This may be a good opportunity to upgrade to the latest version!)
- Unzip each of your files from setp 3, and run the installer script from each, connected to the appropriate PDB
The Setup
I have a 12.1.0.2.0 CDB with two PDBs running APEX. One PDB has multiple workspaces, the other PDB has only one workspace. The CDB is the default APEX 4.2.5.0.00.08 that shipped with 12.1.0.2.0. The workspaces may have SQL scripts uploaded to SQL Workshop, SQL History and Saved SQL that we want to preserve. There are sample and packaged applications that we want to preserve. There are also custom built applications on objects in the schema associated with the workspaces. There are workspace images, and static files that we also want to preserve. I have already completely backed up my CDB.HR Workspace in APEX1 figures
 |
| Applications in HR |
 |
| SQL Script in SQL Workshop |
 |
| SQL History in HR |
 |
| Workspace image in HR |
 |
| Static file in HR |
FINANCE Workspace in APEX1 figures
 |
| Applications in FINANCE workspace |
 |
| Saved SQL in SQL Workshop |
MARKETING Workspace in APEX2 figures
 |
| Applications in MARKETING workspace |
 |
| Workspace Images in MARKETING workspace |
 |
| Saved SQL in SQL Workshop |
The Hook
Identify all PDBs that have APEX instances
SQL> select p.pdb_name, r.version, r.status from sys.dba_pdbs p, sys.cdb_registry r where p.pdb_id = r.con_id and r.comp_id = 'APEX' order by 1;PDB_NAME VERSION STATUS
------------------------------ ------------------------------ -----------
APEX1 4.2.5.00.08 VALID
APEX2 4.2.5.00.08 VALID
Identify all workspaces
SQL> set num 40SQL> alter session set container=APEX1;
Session altered.
SQL> select workspace_id from apex_workspaces where workspace_id > 100;
WORKSPACE_ID
----------------------------------------
2222525459993115
2336806112004961
SQL> alter session set container=APEX2;
Session altered.
SQL> select workspace_id from apex_workspaces where workspace_id > 100;
WORKSPACE_ID
----------------------------------------
2224405822867543
Run a script to export all artifacts
The original script that I wrote was in C shell and did the job, but my colleague Vlad Uvarov rewrote it in bash (apparently anyone under 40 no longer uses C shell) and vastly improved it. A slightly revised version of the script is listed below.#!/bin/bash -e
THIS_SCRIPT=$(basename "$0" )
THIS_DIR=$(cd "$(dirname "$0" )" && pwd )
CURRENT_DIR=$(pwd )
# ===================================================================================
# Function that displays script usage instructions and terminates the script
#
f_usage () {
cat <<EOF
Usage: $THIS_SCRIPT <JDBC connection string> <user> <password> <workspace ID>
Parameters:
JDBC connection string Database connection URL in JDBC format
user Database username
password Password of the database user
workspace ID ID of the workspace to be exported
Example:
./$THIS_SCRIPT //apex.example.com:1521/orcl apex_040200 secret 1234567890
EOF
exit 1
}
# ===================================================================================
# First, check environment variables and input parameters
#
[ -z "$ORACLE_HOME" ] && echo "Error: ORACLE_HOME environment variable is not set." && exit 1
JAVA_EXE=$ORACLE_HOME/jdk/bin/java
[ ! -x "$JAVA_EXE" ] && echo "Error: Java executable not found ($JAVA_EXE)." && exit 1
OJDBC_JAR=$ORACLE_HOME/jdbc/lib/ojdbc6.jar
[ ! -f "$OJDBC_JAR" ] && echo "Error: Oracle JDBC library not found ($OJDBC_JAR)." && exit 1
APEXEXPORT=$ORACLE_HOME/apex/utilities/oracle/apex/APEXExport.class
[ ! -f "$THIS_DIR/$APEXEXPORT" -a ! -f "$APEXEXPORT" ] && echo "Error: Missing APEXExport utility ($APEXEXPORT)." && exit 1
(( $# < 4 )) && echo "Error: This script requires 4 parameters." && echo && f_usage
# ===================================================================================
# Step 1: Export APEX workspace, including applications and files
#
EXP_DIR=$(mktemp -d ${TMPDIR:-/tmp}/$(basename "$THIS_SCRIPT" .sh ).XXXXXX )
cd "$EXP_DIR"
cat <<EOF
Oracle Application Express workspace export
Using ORACLE_HOME=$ORACLE_HOME
EOF
$JAVA_EXE -version
echo
CP=$OJDBC_JAR:$THIS_DIR:$ORACLE_HOME/apex/utilities
if [ "$THIS_DIR" != "$CURRENT_DIR" ]; then
CP=$CP:$CURRENT_DIR
fi
$JAVA_EXE -cp $CP oracle.apex.APEXExport -db "$1" -user "$2" -password "$3" -workspaceid "$4" -expWorkspace -expTeamdevdata
$JAVA_EXE -cp $CP oracle.apex.APEXExport -db "$1" -user "$2" -password "$3" -workspaceid "$4" -expFiles
$JAVA_EXE -cp $CP oracle.apex.APEXExport -db "$1" -user "$2" -password "$3" -workspaceid "$4" -expLocked -expSavedReports
# ===================================================================================
# Step 2: Create ZIP archive with a generated installation script and all export files
#
INSTALL_SCRIPT=install_${4}.sql
cat > "$INSTALL_SCRIPT" <<EOF
prompt
spool install_${4}.log
prompt Oracle Application Express workspace export
prompt Workspace ID $4 exported on $(date )
alter session set current_schema = APEX_050100;
@@w${4}.sql
EOF
for f in *.sql; do
if [ "$f" != "w${4}.sql" -a "$f" != "$INSTALL_SCRIPT" ]; then
echo "@@$f" >> "$INSTALL_SCRIPT"
fi
done
cat >> "$INSTALL_SCRIPT" <<EOF
spool off
prompt
exit
EOF
echo
ZIP_FILE="$CURRENT_DIR/install_${4}_$(date +%Y%m%d ).zip"
rm -f "$ZIP_FILE"
zip -9 "$ZIP_FILE" *.sql
echo
echo "Generated $ZIP_FILE"
echo
# ===================================================================================
# Step 3: Clean up
#
cd "$CURRENT_DIR"
rm -rf "$EXP_DIR"
workspace_export.shOne thing to note in the script above is that the install script being generated assumes that APEX 5.1 is installed in your target APEX instance. If that is not your plan, change the line "alter session set current_schema = APEX_050100" to match the APEX schema of the version you plan to install locally in your PDBs.
Also, for convenience, I am going to temporarily unlock APEX_040200 in my CDB and set a known password, and pass those necessary credentials to the workspace_export.sh script. You could really use any database user that has been granted the APEX_ADMINISTRATOR_ROLE.
SQL> alter user apex_040200 account unlock identified by oracle container=all;
User altered.
I saved the script above in a directory where I want all my zip files to end up. Now I will call the script passing each of the workspace IDs I identified in the previous step.
[jstraub@slc02otv cdbconvertapex]$ ./workspace_export.sh //localhost:1521/APEX1 APEX_040200 oracle 2222525459993115
Oracle Application Express workspace export
Using ORACLE_HOME=/scratch/jstraub/app/product/12.1.0/dbhome_1
java version "1.6.0_75"
Java(TM) SE Runtime Environment (build 1.6.0_75-b13)
Java HotSpot(TM) 64-Bit Server VM (build 20.75-b01, mixed mode)
Exporting Workspace 2222525459993115:'HR'
Completed at Fri Feb 03 08:29:07 PST 2017
Exporting Application 100:'Sample Database Application'
Completed at Fri Feb 03 08:29:16 PST 2017
Exporting Application 102:'Checklist Manager'
Completed at Fri Feb 03 08:29:17 PST 2017
Exporting Application 103:'EMPLOYEES'
Completed at Fri Feb 03 08:29:18 PST 2017
Exporting Application 104:'Sample Websheet Application - Big Cats'
Completed at Fri Feb 03 08:29:18 PST 2017
adding: f100.sql (deflated 88%)
adding: f102.sql (deflated 89%)
adding: f103.sql (deflated 93%)
adding: files_2222525459993115.sql (deflated 55%)
adding: install_2222525459993115.sql (deflated 39%)
adding: w2222525459993115.sql (deflated 87%)
adding: ws104.sql (deflated 64%)
Generated /scratch/jstraub/cdbconvertapex/install_2222525459993115_20170203.zip
[jstraub@slc02otv cdbconvertapex]$ ./workspace_export.sh //localhost:1521/APEX1 APEX_040200 oracle 2336806112004961
Oracle Application Express workspace export
Using ORACLE_HOME=/scratch/jstraub/app/product/12.1.0/dbhome_1
java version "1.6.0_75"
Java(TM) SE Runtime Environment (build 1.6.0_75-b13)
Java HotSpot(TM) 64-Bit Server VM (build 20.75-b01, mixed mode)
Exporting Workspace 2336806112004961:'FINANCE'
Completed at Fri Feb 03 10:17:59 PST 2017
Exporting Application 101:'Sample Database Application'
Completed at Fri Feb 03 10:18:13 PST 2017
Exporting Application 105:'Group Calendar'
Completed at Fri Feb 03 10:18:14 PST 2017
Exporting Application 106:'QUOTES'
Completed at Fri Feb 03 10:18:14 PST 2017
adding: f101.sql (deflated 88%)
adding: f105.sql (deflated 89%)
adding: f106.sql (deflated 93%)
adding: files_2336806112004961.sql (deflated 64%)
adding: install_2336806112004961.sql (deflated 39%)
adding: w2336806112004961.sql (deflated 82%)
Generated /scratch/jstraub/cdbconvertapex/install_2336806112004961_20170203.zip
And then for the other PDB, APEX2, we pass a different connect string:
[jstraub@slc02otv cdbconvertapex]$ ./workspace_export.sh //localhost:1521/APEX2 APEX_040200 oracle 2224405822867543
Oracle Application Express workspace export
Using ORACLE_HOME=/scratch/jstraub/app/product/12.1.0/dbhome_1
java version "1.6.0_75"
Java(TM) SE Runtime Environment (build 1.6.0_75-b13)
Java HotSpot(TM) 64-Bit Server VM (build 20.75-b01, mixed mode)
Exporting Workspace 2224405822867543:'MARKETING'
Completed at Fri Feb 03 10:20:04 PST 2017
Exporting Application 100:'Sample Database Application'
Completed at Fri Feb 03 10:20:13 PST 2017
Exporting Application 101:'Sample Websheet Application - AnyCo IT Department'
Completed at Fri Feb 03 10:20:13 PST 2017
Exporting Application 102:'PROJECT_TASKS'
Completed at Fri Feb 03 10:20:14 PST 2017
Exporting Application 103:'Decision Manager'
Completed at Fri Feb 03 10:20:14 PST 2017
Exporting Application 104:'P-Track'
Completed at Fri Feb 03 10:20:17 PST 2017
adding: f100.sql (deflated 88%)
adding: f102.sql (deflated 93%)
adding: f103.sql (deflated 89%)
adding: f104.sql (deflated 89%)
adding: files_2224405822867543.sql (deflated 54%)
adding: install_2224405822867543.sql (deflated 40%)
adding: w2224405822867543.sql (deflated 82%)
adding: ws101.sql (deflated 58%)
Generated /scratch/jstraub/cdbconvertapex/install_2224405822867543_20170203.zip
The long game
I have a complete backup of my database, and I have all the zip files that will reconstruct my workspaces. It is time to do the actual conversion.Remove APEX from the CDB and all PDBs
Connected to:Oracle Database 12c Enterprise Edition Release 12.1.0.2.0 - 64bit Production
With the Partitioning, OLAP, Advanced Analytics and Real Application Testing options
SQL> @apxremov_con.sql
PL/SQL procedure successfully completed.
Performing installation in multitenant container database in the background.
The installation progress is spooled into apxremov*_con*.log files.
Please wait...
catcon: ALL catcon-related output will be written to apxremov1_con_catcon_9311.lst
catcon: See apxremov1_con*.log files for output generated by scripts
catcon: See apxremov1_con_*.lst files for spool files, if any
catcon.pl: completed successfully
catcon: ALL catcon-related output will be written to apxremov2_con_catcon_9723.lst
catcon: See apxremov2_con*.log files for output generated by scripts
catcon: See apxremov2_con_*.lst files for spool files, if any
catcon.pl: completed successfully
Installation completed. Log files for each container can be found in:
apxremov*_con*.log
You can quickly scan for ORA errors or compilation errors by using a utility
like grep:
grep ORA- *.log
grep PLS- *.log
Install APEX 5.1 locally in the PDBs
SQL> alter session set container=APEX1;Session altered.
SQL> @apexins.sql SYSAUX SYSAUX TEMP /i/
SQL> @apex_rest_config.sql
SQL> @apxchpwd.sql
SQL> @apex_epg_config.sql /scratch/jstraub/apx51 -- only if you are using EPG, very doubtful
SQL> alter session set container=APEX2;
Session altered.
SQL> @apexins.sql SYSAUX SYSAUX TEMP /i/
SQL> @apex_rest_config.sql
SQL> @apxchpwd.sql
SQL> @apex_epg_config.sql /scratch/jstraub/apx51 -- only if you are using EPG, very doubtful
Recreate the workspaces using the generated zip files
First, I am again going to temporarily unlock and change the password for the APEX database user, in this case APEX_050100. Since now APEX_050100 is a local user to the PDB, I have to do it in both APEX1 and APEX2 PDBs.SQL> alter session set container=APEX1;
Session altered.
SQL> alter user APEX_050100 account unlock identified by oracle;
User altered.
SQL> alter session set container=APEX2;
Session altered.
SQL> alter user APEX_050100 account unlock identified by oracle;
User altered.
Then I unzip each complete workspace export and run the corresponding install script.
[jstraub@slc02otv cdbconvertapex]$ mkdir hr
[jstraub@slc02otv cdbconvertapex]$ unzip install_2222525459993115_20170203.zip -d hr
[jstraub@slc02otv cdbconvertapex]$ cd hr
[jstraub@slc02otv hr]$ sqlplus apex_050100/oracle@localhost/APEX1
SQL*Plus: Release 12.1.0.2.0 Production on Fri Feb 3 12:05:24 2017
Copyright (c) 1982, 2014, Oracle. All rights reserved.
Connected to:
Oracle Database 12c Enterprise Edition Release 12.1.0.2.0 - 64bit Production
With the Partitioning, OLAP, Advanced Analytics and Real Application Testing options
SQL> @install_2222525459993115.sql
[jstraub@slc02otv cdbconvertapex]$ mkdir finance
[jstraub@slc02otv cdbconvertapex]$ unzip install_2336806112004961_20170203.zip -d finance
[jstraub@slc02otv cdbconvertapex]$ cd finance
[jstraub@slc02otv finance]$ sqlplus apex_050100/oracle@localhost/APEX1
SQL*Plus: Release 12.1.0.2.0 Production on Fri Feb 3 12:14:21 2017
Copyright (c) 1982, 2014, Oracle. All rights reserved.
Last Successful login time: Fri Feb 03 2017 12:05:24 -08:00
Connected to:
Oracle Database 12c Enterprise Edition Release 12.1.0.2.0 - 64bit Production
With the Partitioning, OLAP, Advanced Analytics and Real Application Testing options
SQL> @install_2336806112004961.sql
[jstraub@slc02otv cdbconvertapex]$ mkdir marketing
[jstraub@slc02otv cdbconvertapex]$ unzip install_2224405822867543_20170203.zip -d marketing
[jstraub@slc02otv marketing]$ sqlplus apex_050100/oracle@localhost/APEX2
SQL*Plus: Release 12.1.0.2.0 Production on Fri Feb 3 12:16:11 2017
Copyright (c) 1982, 2014, Oracle. All rights reserved.
Connected to:
Oracle Database 12c Enterprise Edition Release 12.1.0.2.0 - 64bit Production
With the Partitioning, OLAP, Advanced Analytics and Real Application Testing options
SQL> @install_2224405822867543.sql
Now we login to each workspace and check that all the artifacts from the workspace migrated over.
HR workspace in APEX1 figures - APEX 5.1
 |
| Applications in HR Workspace |
 |
| Static Files and Images in HR Workspace |
 |
| SQL Script in SQL Workshop |
 |
| SQL History in SQL Workshop |
FINANCE workspace in APEX1 figures - APEX 5.1
 |
| Applications in FINANCE Workspace |
 |
| Saved SQL in SQL Workshop |
MARKETING workspace in APEX2 figures - APEX 5.1
 |
| Applications in MARKETING Workspace |
 |
| Static Workspace Files in MARKETING |
 |
| Saved SQL in SQL Workshop |
One more thing
Actually, two more things. First, this process will not bring over "Template Applications" and "Public Themes." These features are not well known and rarely used, but you can easily determine if you have them by logging into internal administration, click on Manage Instance, and then click the Public Themes and Template Applications links. If there are applications in either area, simply export them, and them import them into internal administration after you recreate your workspaces.Second, you may want to create another PDB, call it APEX51SEED, and install APEX into it. Put the PDB in read only mode, and then when you create a new PDB, you can create it from APEX51SEED and it will already have APEX 5.1 installed locally. In our case, we could not use this method to install APEX only once, because we needed the schemas that were in our APEX1 and APEX2 PDBs.
Conclusion
Having APEX installed locally in PDBs provides greater flexibility in your CDB, reduces upgrade time, and as well simplifies unplug/plug operations of your PDBs between CDBs. If you have a CDB where APEX is installed common, and you are using APEX in some or all of those PDBs, it is possible to do an in-place conversion using the method described above. Unfortunately, there is no magic SQL or script that can simplify this process. I hope you are successful if you go down this path, but be sure you have a complete backup of your CDB before trying. You can also use parts of this method to simply move a workspace from one APEX instance to another. That would require you to also move the schema, using datapump or another utility.Friday, January 6, 2017
Ooops... I did it again.
APEX 5.1 is released! As Shaun points out at this forum post, the appendix of the Oracle Application Express 5.1 Installation Guide is missing instructions to downgrade back to 5.0, after a failed upgrade attempt.
My bad. I signed off on the Oracle Application Express Installation Guide as being complete for 5.1. Unfortunately, I did not pay enough attention to the appendix. We will get this corrected soon in a refreshed version of the Installation Guide, but in the meantime, below are the instructions we will be including.
On UNIX and Linux:
My bad. I signed off on the Oracle Application Express Installation Guide as being complete for 5.1. Unfortunately, I did not pay enough attention to the appendix. We will get this corrected soon in a refreshed version of the Installation Guide, but in the meantime, below are the instructions we will be including.
Reverting
to Release 5.0 in a non-CDB
To
revert to a previous Oracle Application Express release 5.0 in a non-CDB:
- If you altered your images directory, revert it back to the release you want to revert to. See "Reverting the Images Directory."
- Change your working directory to apex/core in the 5.0 source.
- Start SQL*Plus and connect to the database where Oracle
Application Express is installed as SYS specifying the SYSDBA role:
On Windows:
SYSTEM_DRIVE:\
sqlplus /nolog
SQL>
CONNECT SYS as SYSDBA
Enter
password: SYS_password
On UNIX and Linux:
$
sqlplus /nolog
SQL>
CONNECT SYS as SYSDBA
Enter
password: SYS_password
- Execute the following commands:
alter session set current_schema = SYS;

@wwv_flow_val.sql
@wwv_flow_val.plb

begin
     dbms_utility.compile_schema('APEX_050000');
end;
/

set define '^'
@validate_apex x x APEX_050000

begin
  for i in ( select owner, trigger_name
               from sys.dba_triggers
              where owner        =    'APEX_050000'
                and trigger_name like 'WWV_FLOW_UPGRADE_%'
              order by 1 )
  loop
    sys.dbms_output.put_line('Dropping trigger '||i.owner||'.'||i.trigger_name);
    execute immediate 'drop trigger '||i.owner||'.'||i.trigger_name;
  end loop;
end;
/

ALTER SESSION SET CURRENT_SCHEMA = APEX_050000;
exec apex_050000.wwv_flow_upgrade.switch_schemas('APEX_050100','APEX_050000');
ALTER SESSION SET CURRENT_SCHEMA = SYS;
drop context APEX$SESSION;
create context APEX$SESSION using APEX_050000.WWV_FLOW_SESSION_CONTEXT;
declare
     l_apex_version varchar2(30);
     l_schemas sys.dbms_registry.schema_list_t;
begin
     l_apex_version := apex_050000.wwv_flows_release;
     dbms_registry.downgrading('APEX','Oracle Application Express','validate_apex','APEX_050000');
     dbms_registry.downgraded('APEX',l_apex_version);
     select username
       bulk collect into l_schemas
       from all_users
      where username in ('FLOWS_FILES','APEX_PUBLIC_USER','APEX_LISTENER','APEX_REST_PUBLIC_USER','APEX_INSTANCE_ADMIN_USER')
      order by 1;
     sys.dbms_registry.update_schema_list('APEX', l_schemas);
     validate_apex;
end;
/
- See the next section, "Removing the Oracle Application Express Release 5.1 Schema."
Reverting
to Release 5.0 in a CDB
To
revert to a previous Oracle Application Express release 5.0 in a CDB:
- If you altered your images directory, revert it back to the release you want to revert to. See "Reverting the Images Directory."
- Change your working directory to apex/core in the 5.0 source.
- Create a new text file in that directory named apx50dgrd1.sql consisting of the following:
alter session set current_schema = SYS;

@wwv_flow_val.sql
@wwv_flow_val.plb

begin
     dbms_utility.compile_schema('APEX_050000');
end;
/

set define '^'
@validate_apex x x APEX_050000

begin
  for i in ( select owner, trigger_name
               from sys.dba_triggers
              where owner        =    'APEX_050000'
                and trigger_name like 'WWV_FLOW_UPGRADE_%'
              order by 1 )
  loop
    sys.dbms_output.put_line('Dropping trigger '||i.owner||'.'||i.trigger_name);
    execute immediate 'drop trigger '||i.owner||'.'||i.trigger_name;
  end loop;
end;
/

ALTER SESSION SET CURRENT_SCHEMA = APEX_050000;
exec apex_050000.wwv_flow_upgrade.switch_schemas('APEX_050100','APEX_050000');
ALTER SESSION SET CURRENT_SCHEMA = SYS;
drop context APEX$SESSION;
create context APEX$SESSION using APEX_050000.WWV_FLOW_SESSION_CONTEXT;
declare
     l_apex_version varchar2(30);
     l_schemas sys.dbms_registry.schema_list_t;
begin
     l_apex_version := apex_050000.wwv_flows_release;
     dbms_registry.downgrading('APEX','Oracle Application Express','validate_apex','APEX_050000');
     dbms_registry.downgraded('APEX',l_apex_version);
     select username
       bulk collect into l_schemas
       from all_users
      where username in ('FLOWS_FILES','APEX_PUBLIC_USER','APEX_LISTENER','APEX_REST_PUBLIC_USER','APEX_INSTANCE_ADMIN_USER')
      order by 1;
     sys.dbms_registry.update_schema_list('APEX', l_schemas);
     validate_apex;
end;
/
- Create a second new text file in that directory named apx50dgrd.sql consisting of the following:
set define '^'
whenever sqlerror exit
column :xe_home new_value OH_HOME NOPRINT
variable xe_home varchar2(255)
set serverout on
begin
-- get oracle_home
sys.dbms_system.get_env('ORACLE_HOME',:xe_home);
if length(:xe_home) = 0 then
    sys.dbms_output.put_line(lpad('-',80,'-'));
    raise_application_error (-20001,'Oracle Home environment variable not set' );
end if;
end;
/
whenever sqlerror continue
set termout off
select :xe_home from sys.dual;
set termout on
host ^OH_HOME/perl/bin/perl -I ^OH_HOME/rdbms/admin ^OH_HOME/rdbms/admin/catcon.pl -b apx50dgrd apx50dgrd1.sql
- Start SQL*Plus and connect to CDB$ROOT of the database where Oracle Application Express is installed as SYS specifying the SYSDBA role:
On Windows:
SYSTEM_DRIVE:\
sqlplus /nolog
SQL>
CONNECT SYS as SYSDBA
Enter
password: SYS_password
On UNIX and Linux:
$
sqlplus /nolog
SQL>
CONNECT SYS as SYSDBA
Enter
password: SYS_password
- Execute the following commands:
@apx50dgrd.sql
- See the next section, "Removing the Oracle Application Express Release 5.1 Schema."
Friday, October 28, 2016
"ORA-20001: Application ID and current security group ID are not consistent" encountered during APEX Upgrade from 4.x to 5.x
Recently, our QA team at Oracle was testing database upgrades, and the following error appeared in the database upgrade log while the APEX component was being upgraded:
...Installing Theme 1
API Last Extended:20130101
Your Current Version:20130101
This import is compatible with version: 20130101
COMPATIBLE (You should be able to run this import without issues.)
--application/set_environment
APPLICATION 108801 - Theme: Simple Red
--application/delete_application
begin
*
ERROR at line 1:
ORA-20001: Application ID and current security group ID are not consistent.
ORA-06512: at "APEX_050000.WWV_FLOW_API", line 1419
ORA-06512: at "APEX_050000.WWV_FLOW_API", line 2106
ORA-06512: at line 2
A day later, our support organization reported that a customer ran into exactly the same error when they attempted an APEX upgrade from 4.2.5 to 5.0.4. I tried to reproduce the issue myself, but was unable to in a database I created using DBCA. I then created a database in our RDBMS development environment, and was able to reproduce this issue upgrading 4.2.5 to 5.0.4.
I noticed in the log of my failed installation a message that errors exist in the upgrade progress table.
SQL> select upgrade_error from apex_050000.wwv_flow_upgrade_progress where upgrade_error is not null;
UPGRADE_ERROR
--------------------------------------------------------------------------------
ORA-01000: maximum open cursors exceeded
I checked the open_cursors database parameter of the database where the upgrade failed, and found it was set to 50. I then checked the parameter in the database I created using DBCA, where the APEX upgrade was successful, and noted that it was set to 300. I restored the database of the failed upgrade, and issued the following command:
SQL> alter system set open_cursors=300 scope=both;
I retried the APEX upgrade to 5.0.4 and it completed successfully without errors. If you encounter the above error while doing an APEX upgrade, check the open_cursors parameter, and set it to at least 300.
Subscribe to:
Posts (Atom)